
I recently made some upgrades to my off-grid electrical in my camper. I was starting to have some issues with some of the systems and it seemed a good time to upgrade a bunch of components. When I built the camper, I had a lot of things to build and buy, so I made some more economical choices on a few components and after 5 years I’m happy to be upgrading them. One of the biggest upgrades was going from two 180ah AGM batteries to one 200ah LiFePO4 battery and now have a proper battery monitor and a new MPPT charge controller. Running wires for the new charge controller meant pulling up the floor and it led me to discovering that I had run a screw through the 0awg cable that ran from the battery to the inverter/charger and I also discovered a few other issues that were likely culprits in several of my issues.

I have been living in my rig for a few years now off and on but for the last couple of years it has been on, and 90% off-grid, unsupported. Before that I was working on a home remodel and staying in the house I was working on, or I had a place to plug in the camper and not rely on the solar as much. Everything was working for the most part but I started to have little issues that made simple things more of a hassle. I also went through my first full winter unsupported and it happened to be the wettest, cloudiest winter in recent history. Multiple days of cloud cover in a row really amplified some of the issues and it led me to obtaining a backup generator to have enough power to get through.
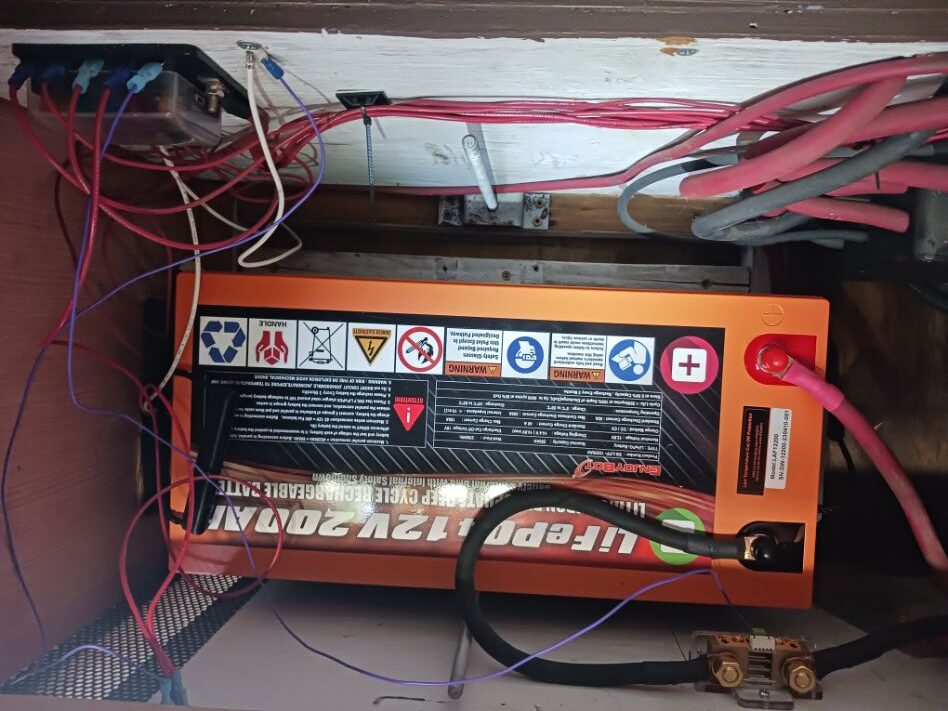
First major issue, my fridge has a shut off when the batteries drop in voltage that is set to around 80% charge on the batteries. The problem was my aging batteries only held about 85% charge so the fridge wouldn’t run all night. AGM, and other lead acid batteries lose voltage as they drop in charge unlike lithium that maintains voltage pretty well up until the end of their capacity. While I had two 180ah batteries I could only really use the top 72ahs and after my capacity dropped to 85%, I really only had around 18ahs to use after the sun went down. With the new lithium battery, I should be able to use it all the way down to 10%-15% capacity before the voltage drops below the fridges low voltage rating giving me over 180ahs of usable battery storage, a significant improvement.
With the upgrade of the battery came the need to upgrade a few other things. Since the beginning I have been using the 60amp, MPPT controller built into my AIMS inverter/charger but it has been kind of a hassle. It has no readout, and no indicator that it is working of any kind, not even an indicator light. As my batteries appeared as though they were getting charged throughout the day, I had to just assume it was doing its job, and it did, but I had no way of diagnosing any issues I was having. A couple other issues, I couldn’t series my solar panels on the roof to a higher voltage to drop the amps and it only had settings for lead batteries so it wouldn’t optimally charge the new LiFePO4 battery. I didn’t immediately purchase the new controller, and initially the built in one was working, but a few weeks after getting the new battery installed the controller gave up the ghost leaving me running off my generator for a week or so to charge the batteries till the new controller came in. Living in rural Colorado has its positives and negatives and amazon taking a week to week and a half to deliver anything I order is a negative.
")
I have to compliment AIMS in this post, over the years I have reached out to them to see if I could set up the built in controller in different configurations and each time, I got a response from one of their developers or engineers and not just a sales rep or other person that wouldn’t truly understand how the system works. I was informed each time that they stopped offering the built in controller in their inverters as they had a lot of issues with them and always recommended, I upgrade to something better but then gave me info on making it work with what I had. I must have gotten one of the last one of these units because I had to send photos of the case with the wording indicating it had one before they would get the person that remembered they once made one haha.
Discovery:
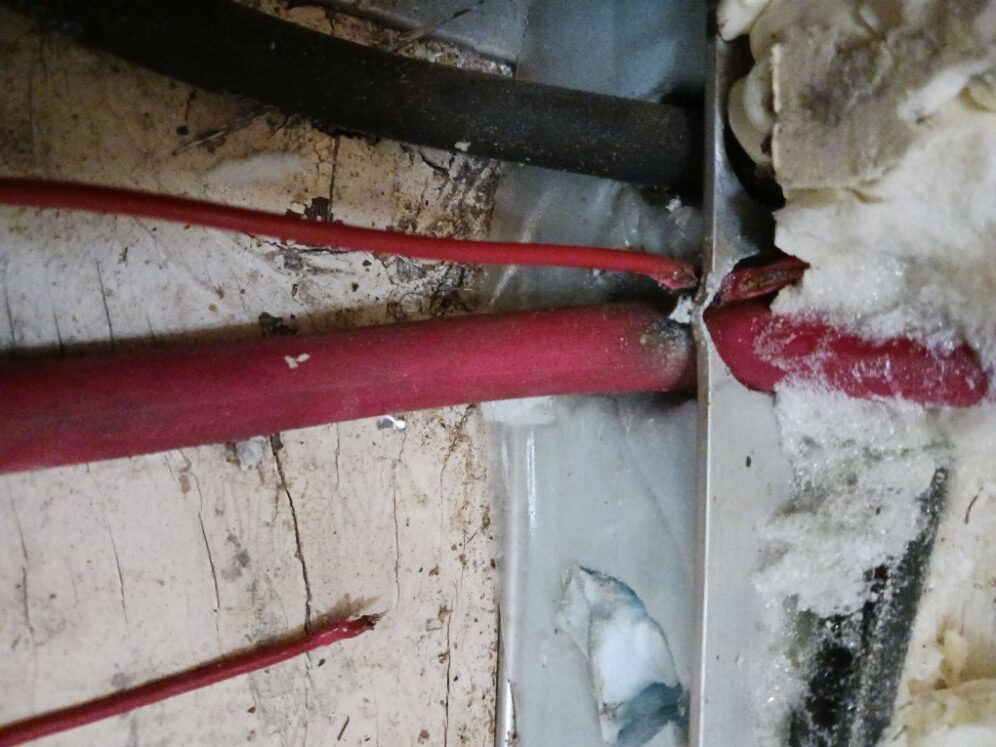
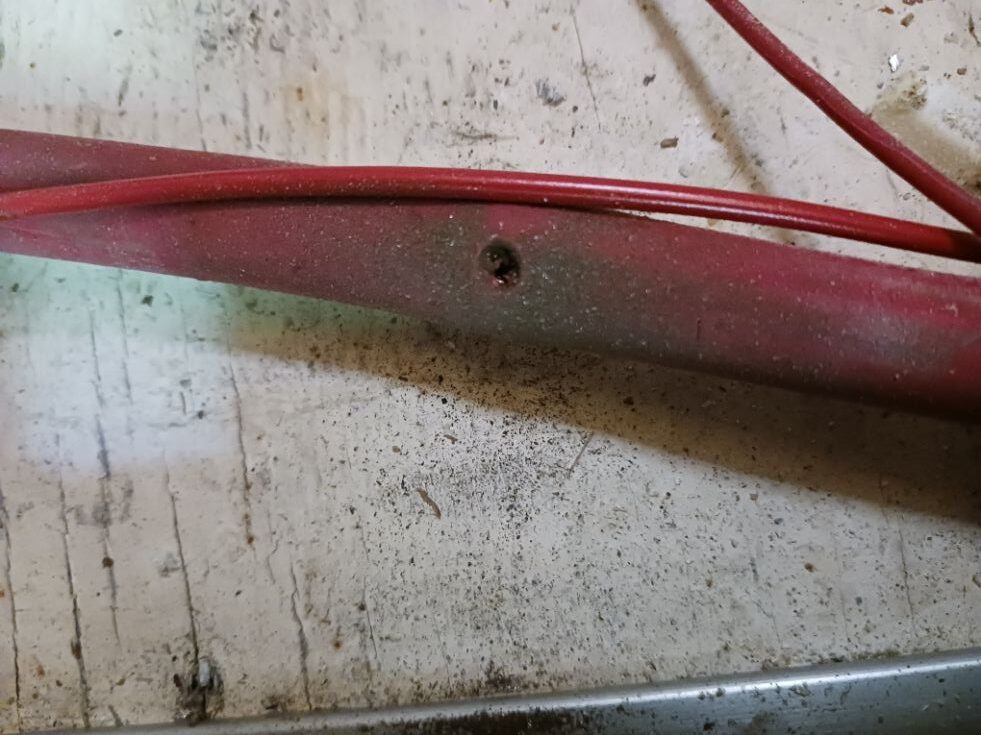
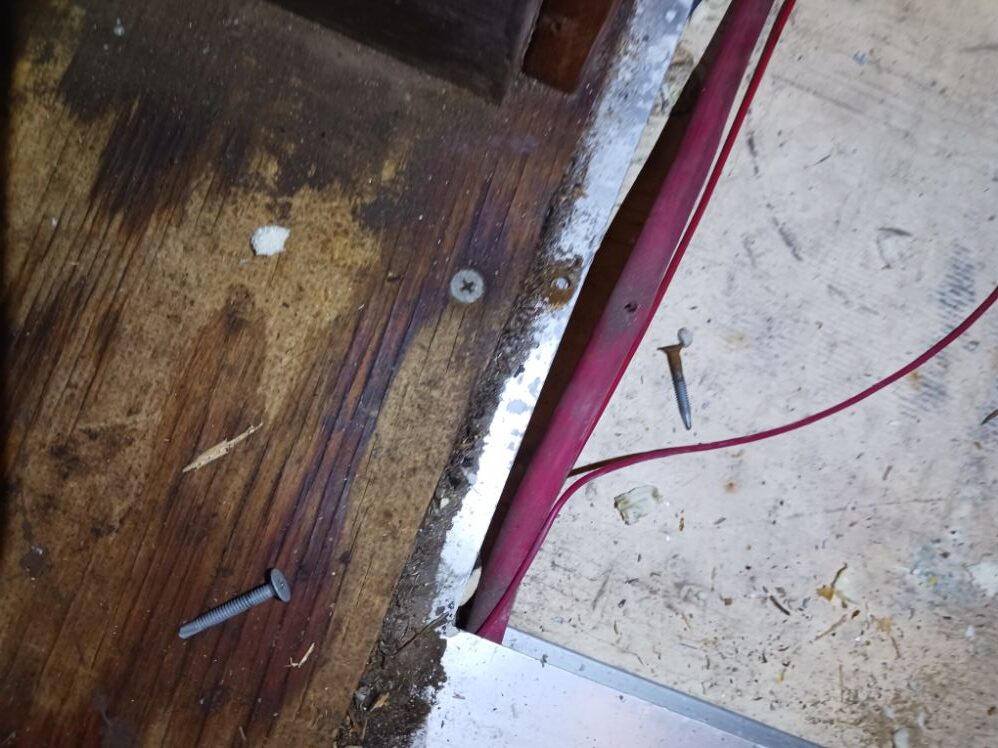
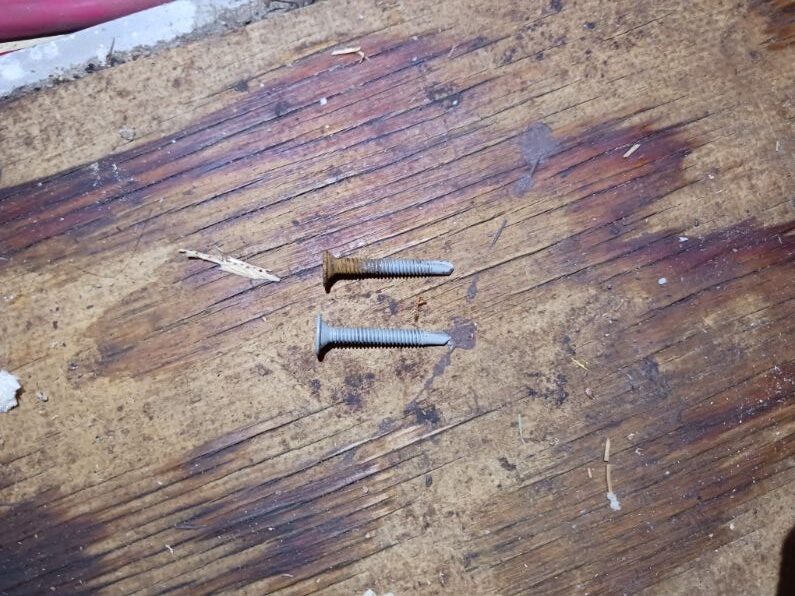
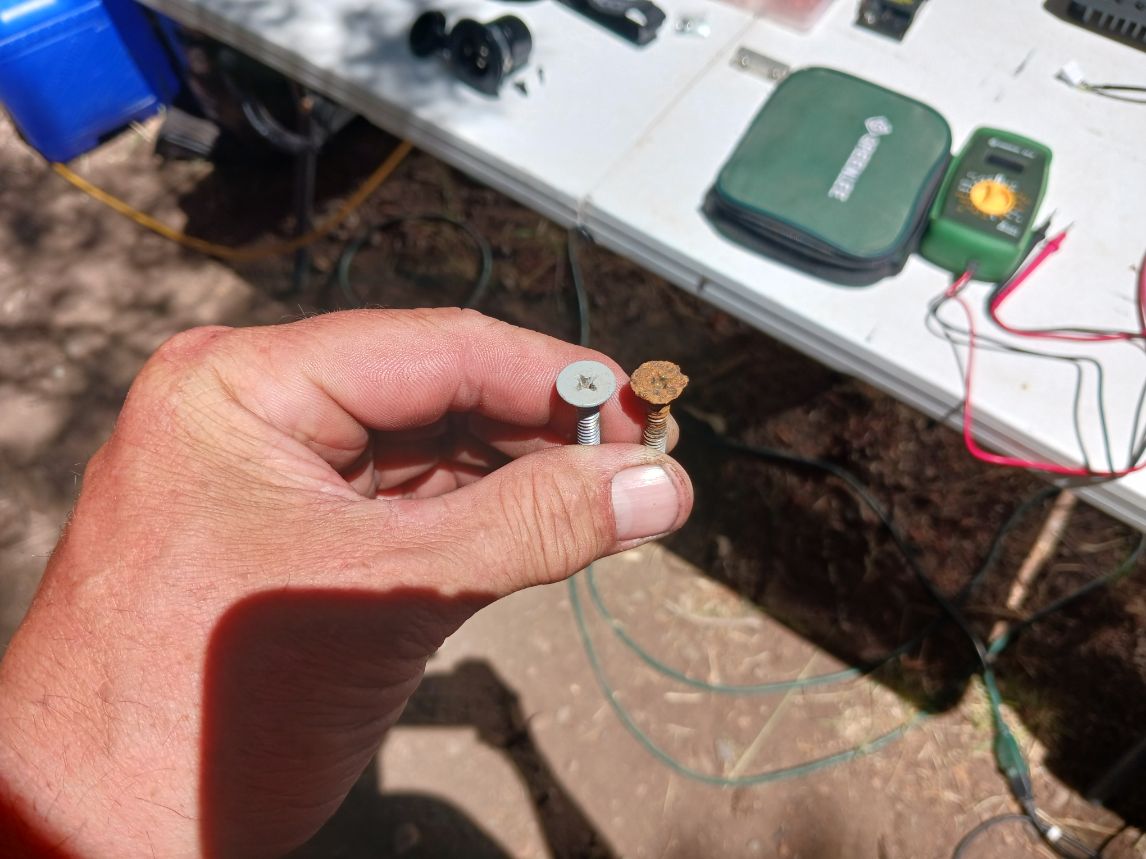
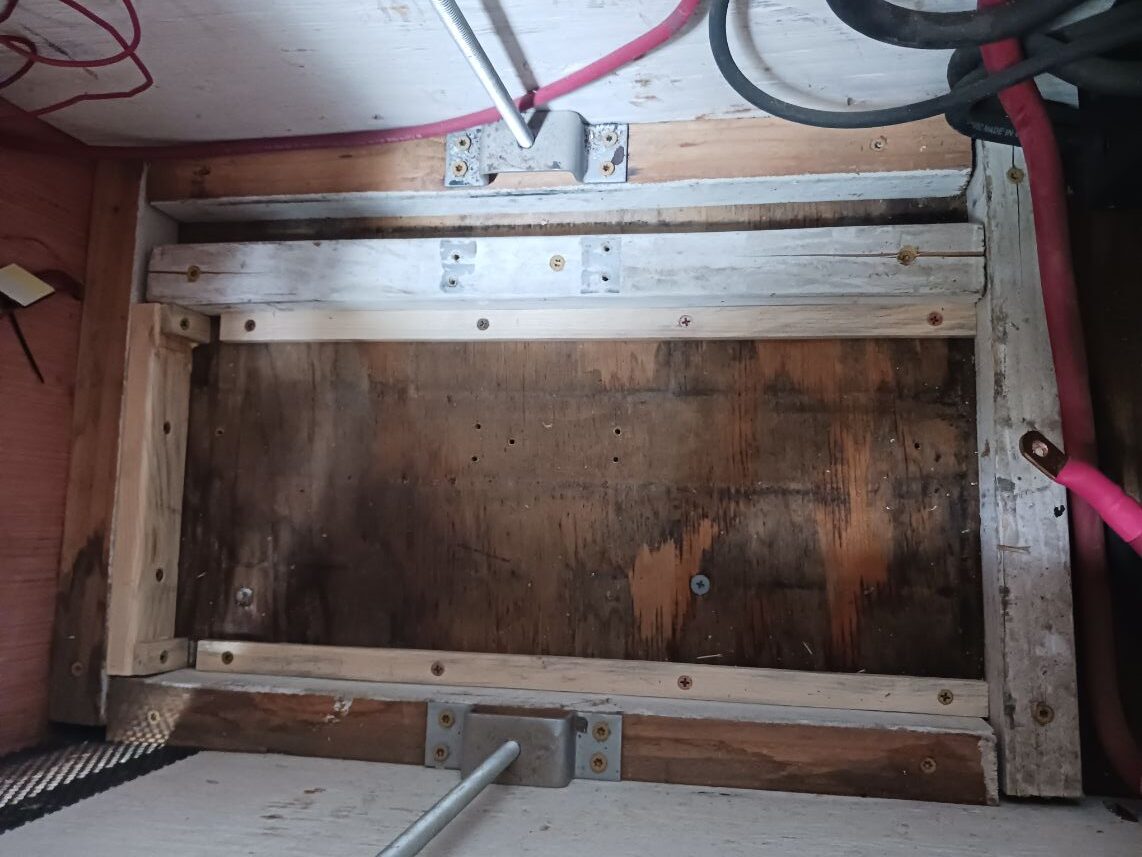
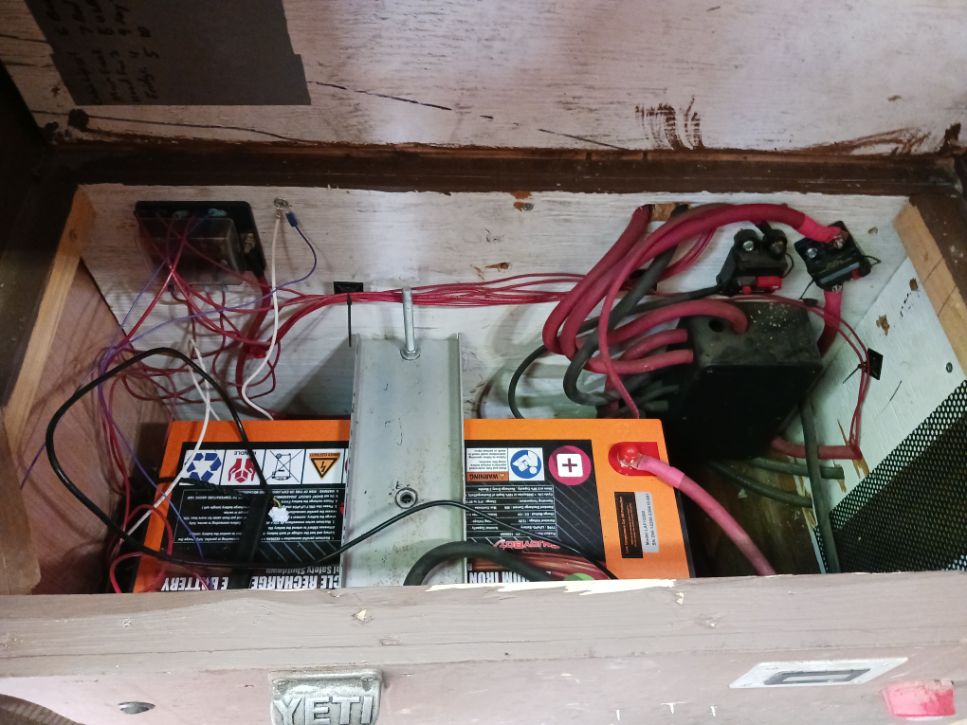
During the install of all of these new components I discovered some major issues that were more likely the culprit in many but not all of my problems. I had to pull the floor back up to run new wires for the charge controller, while I was in there, I realized that I had run a screw through the positive 0awg wire that went from the battery box to the inverter/charger. The screw ran through what I thought was the grounded frame of the camper before going into the wire. Also, the wire run for the fridge was abraded on a sharp edge on one of the holes in the frame that it ran through. When I pulled the screw out of the 0awg wire all the lights in the camper went out and that is when I discovered that the ground wasn’t properly bonded and the entire camper was being grounded through that screw, scary. Obviously, several mistakes were made by me here, I actually remember thinking when I screwed the floor down that I must have missed all of the wires because I didn’t blow any breakers. I’m surprised the system worked at all, but it operated with only a few glitchy issues for over 5 years. I was starting to think my fridge was on the frits, nope, it’s wire in the wall was just shorting on the frame.

The reason my ground wasn’t bonding, I used anodized aluminum when I built the frame and this is as good as paint for blocking the current. Originally, it was grounding through the bolt in the hole through the frame, but not well. I took my grinder and sanded off the anodizing then smothered it in dielectric grease before bolting it back down. There is a potential issue when bolting copper to aluminum where galvanic corrosion could allow a layer of oxidation to form between the two causing arcing and possible fire. The dielectric grease should slow the oxidation process and I’ll just have to inspect it every few years. I could have run an aluminum wire for the ground but the other end of the wire is bolted to the copper buss bar so one way or another it would be copper to aluminum. The dielectric grease should keep it from being an issue for many, many years so I’m not worried.
LiFePO4 Battery:
When I first started to put together my build, my buddy that helped me layout all of the components I needed, worked for a solar company. One day, someone at his work took a pallet of AGM batteries and stacked them on top of another pallet crushing the batteries below. Most of the batteries were just blemished but they couldn’t be sold as new so the decision was made to recycle them, I don’t know the exact details. My buddies boss told him that if he brought in dead car batteries he could take as many of the damaged AGMs matching pound for pound as they were just off to the recycler. Turned out my buddy’s father-in-law had a huge pile of dead car batteries and they ended up with almost the entire pallet in exchange and two of them went to me. Hard to say no to free batteries.
For the first several years the batteries worked great and stored more power than I needed most of the time. I live in the desert so the sun shines 300+ days a year but I had to have sun or find another way to charge the batteries every day, this wasn’t an issue till last winter. I did make one big mistake that I think might have shortened the life of the batteries a little, though all batteries do loose capacity over time. When I was working on that home remodel, I left the camper mostly unattended thinking the solar would keep them topped off. Unfortunately, I had installed an inline fuse that blew and the batteries went quite some time without being charged. They should have been full when it happened but they were below 50% when I discovered it. Who knows how long they were not being charged but the summers were in the 100s and the winters were in the single digits during that time. It may be the natural cycle but, I never let the batteries drop below 80% for the majority of time they were in service, so I expected to get a little more service out of them, but it is what it is. If the fridge didn’t limit me to only using the battery to 80%, and I could actually use the battery down to 50%, I would still be good for much longer. The positive side, they won’t got to waste, a buddy of mine is going to use them in a solar water heater system he’s working on so they will still get used for several more years.
The new Lithium battery has so much more capacity, it’s really nice. When the charge controller went out, I was able to go 2 full days with absolutely no charging it and still had plenty of power. Before, with the AGMs, when they were new, I could go over night and into the next day but had no real buffer. Sucks I had to test it right out the gate, but nice to know it works. I was able to use the rack I built for the old batteries with a few minor modifications. The foot print of the old batteries was just bigger than the new one so all I had to do was add some blocking. The new battery is shorter but fortunately I used all thread for the hold downs so all I had to do is run the nut down a little farther.
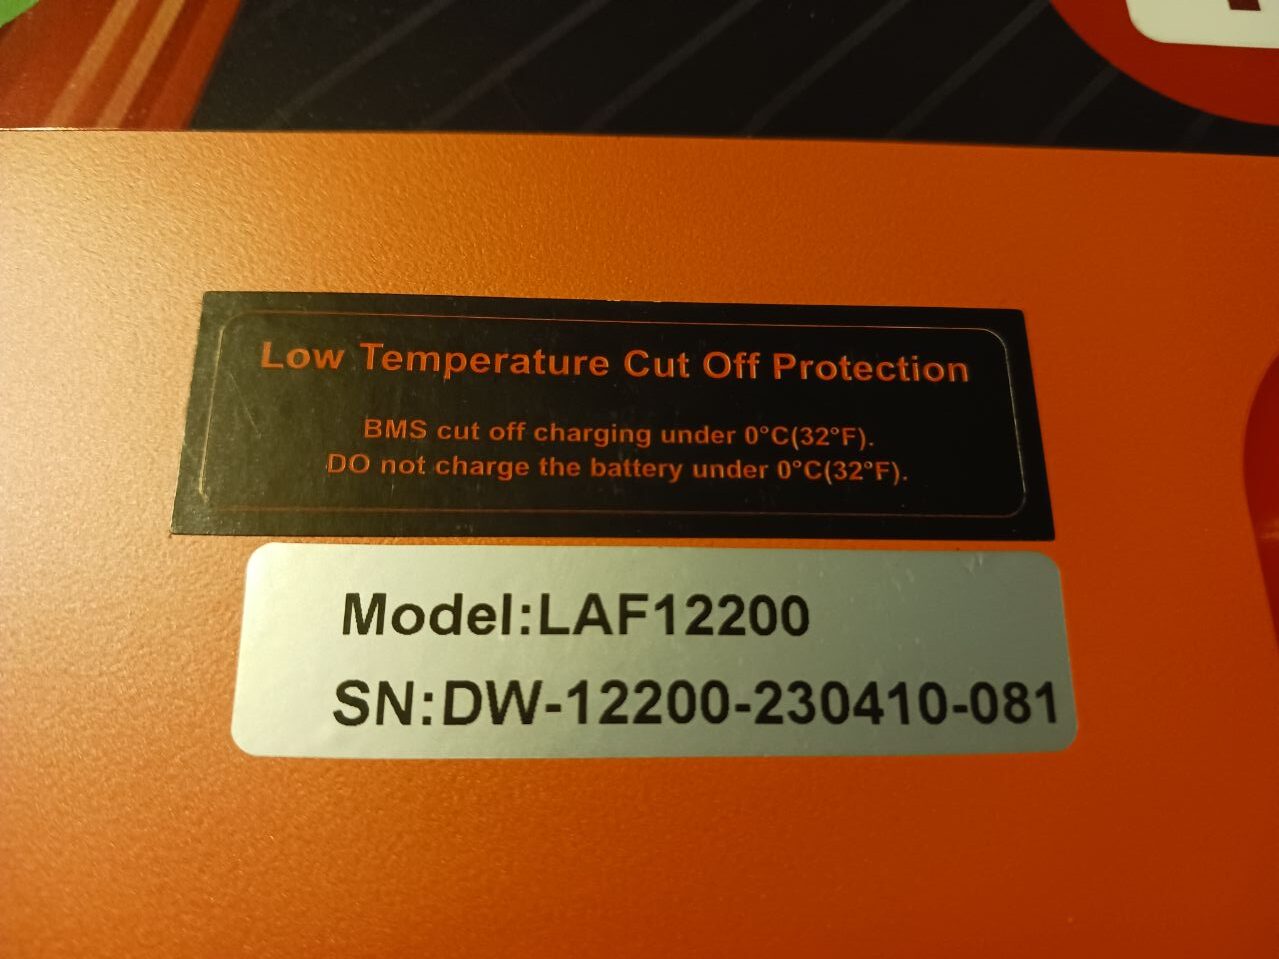
Lithium batteries hate the cold, like it will seriously damage the battery if you try to charge it when the temperature of the cells is below 32°F/0°C. Living in Western Colorado, I see temps from -10° to 110° and single digits are not uncommon for weeks at a time in Jan or Feb. I only run my heater for a few hours at night and in the morning to warm it up so I can get dressed. It’s is not uncommon for it to drop down to the teens in the camper over night or even during the day so a battery heater is going to be necessary. They do make batteries with built in heaters but those are much more expensive so I decided to go with an RV tank heater instead. This tank heater should only draw 5-7amps while it is running and given that the battery is in an insolated box it shouldn’t run very often. The heater has a built-in thermostat that should keep the battery compartment between 45ׄ°and 69°, I also put a switch one it so that I can turn it off completely whenever the forecast is calling for temps above freezing. I didn’t mount it to the battery, or anything else, I just laid it in under the battery and put in some blocking so the battery would not sit directly on the pad. I may put a thermometer prob in the box to keep an eye on it but the BMS in the battery does have a low temp cut off to protect the battery.


New Charge Controller:
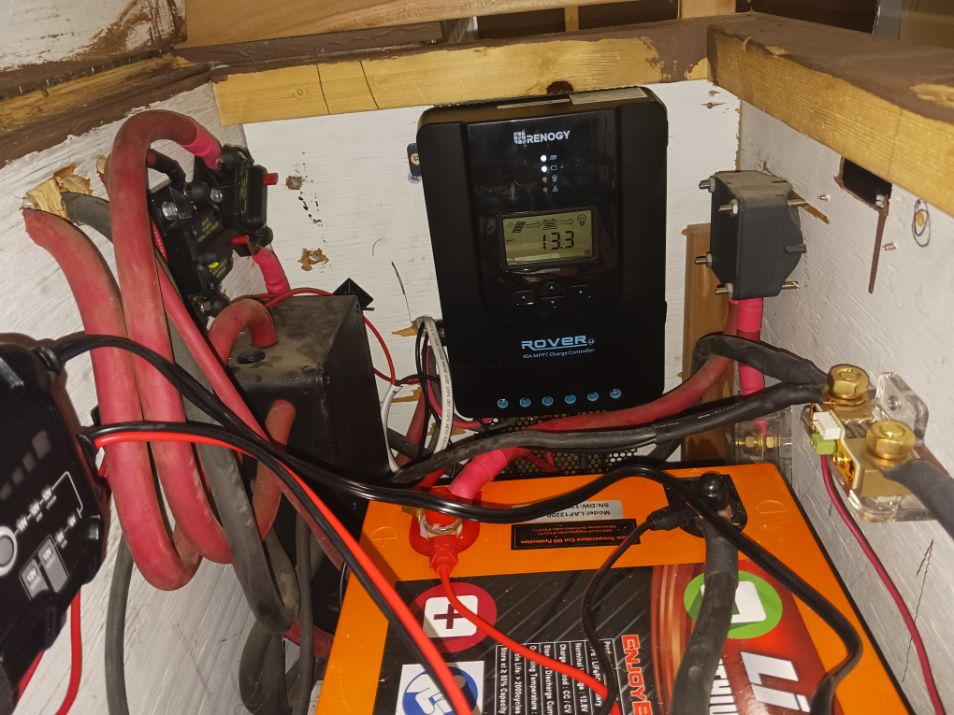
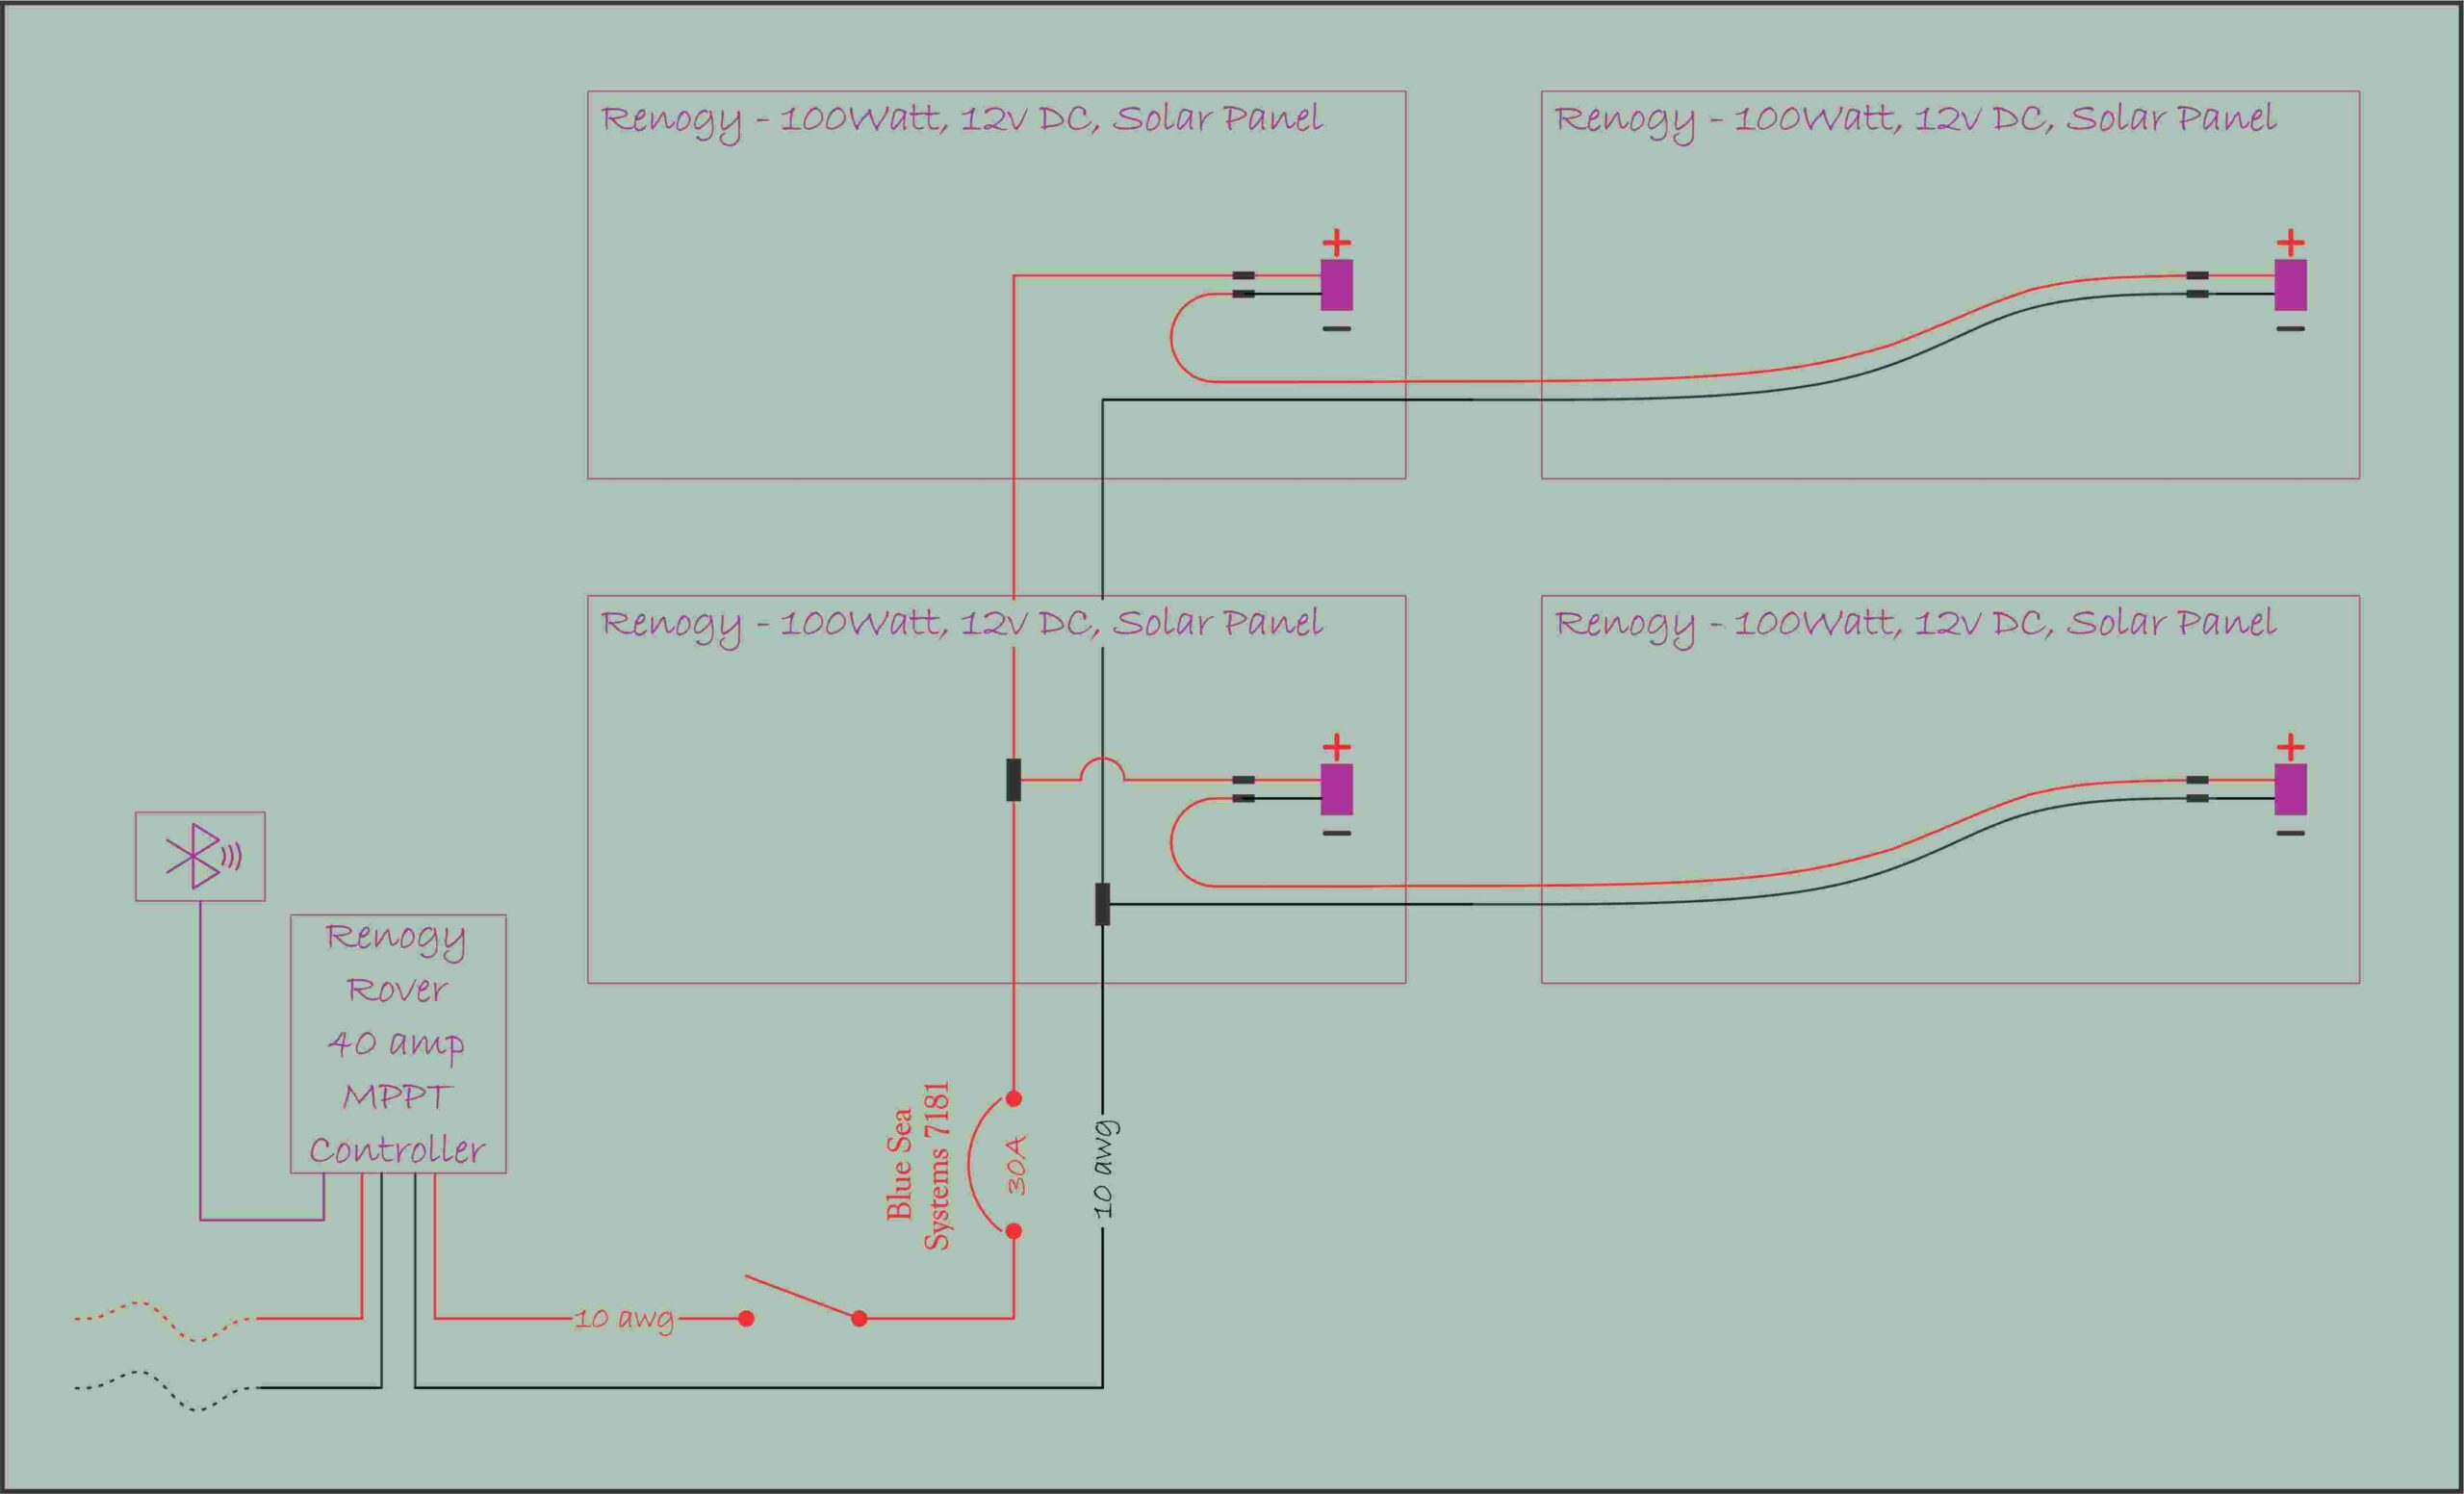
I did a bit of research and settled on the Renogy Rover 40amp charge controller with Bluetooth module. This unit has allowed me to series my panels to 24v making them more efficient but also dropping the amperage running down the wall to the controller, making for less line loss. I also decided to replace the cheap in line fuse with a 30amp breaker from Blue Sea Systems. I left the massive 1250amp kill switch in the system to be able to isolate the solar panels. I’m excited for the new Bluetooth module and app that allows me to see more of what is going on with my charging from my phone. Between the app and the battery monitor I should have an easier time diagnosing problems in the future.
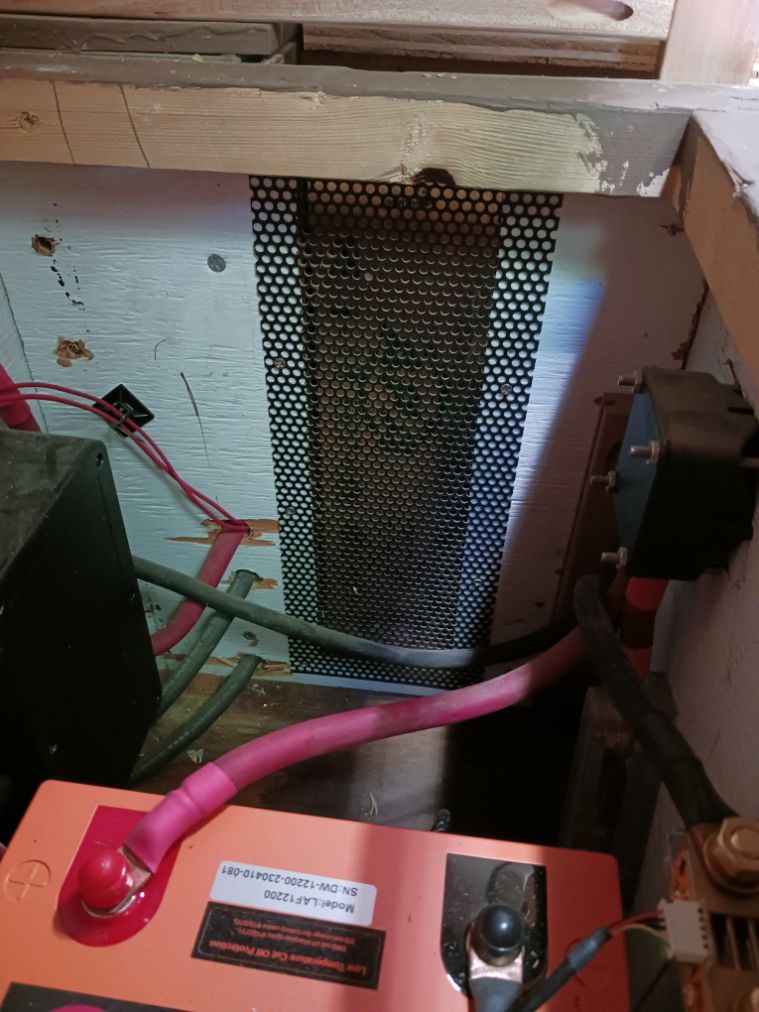
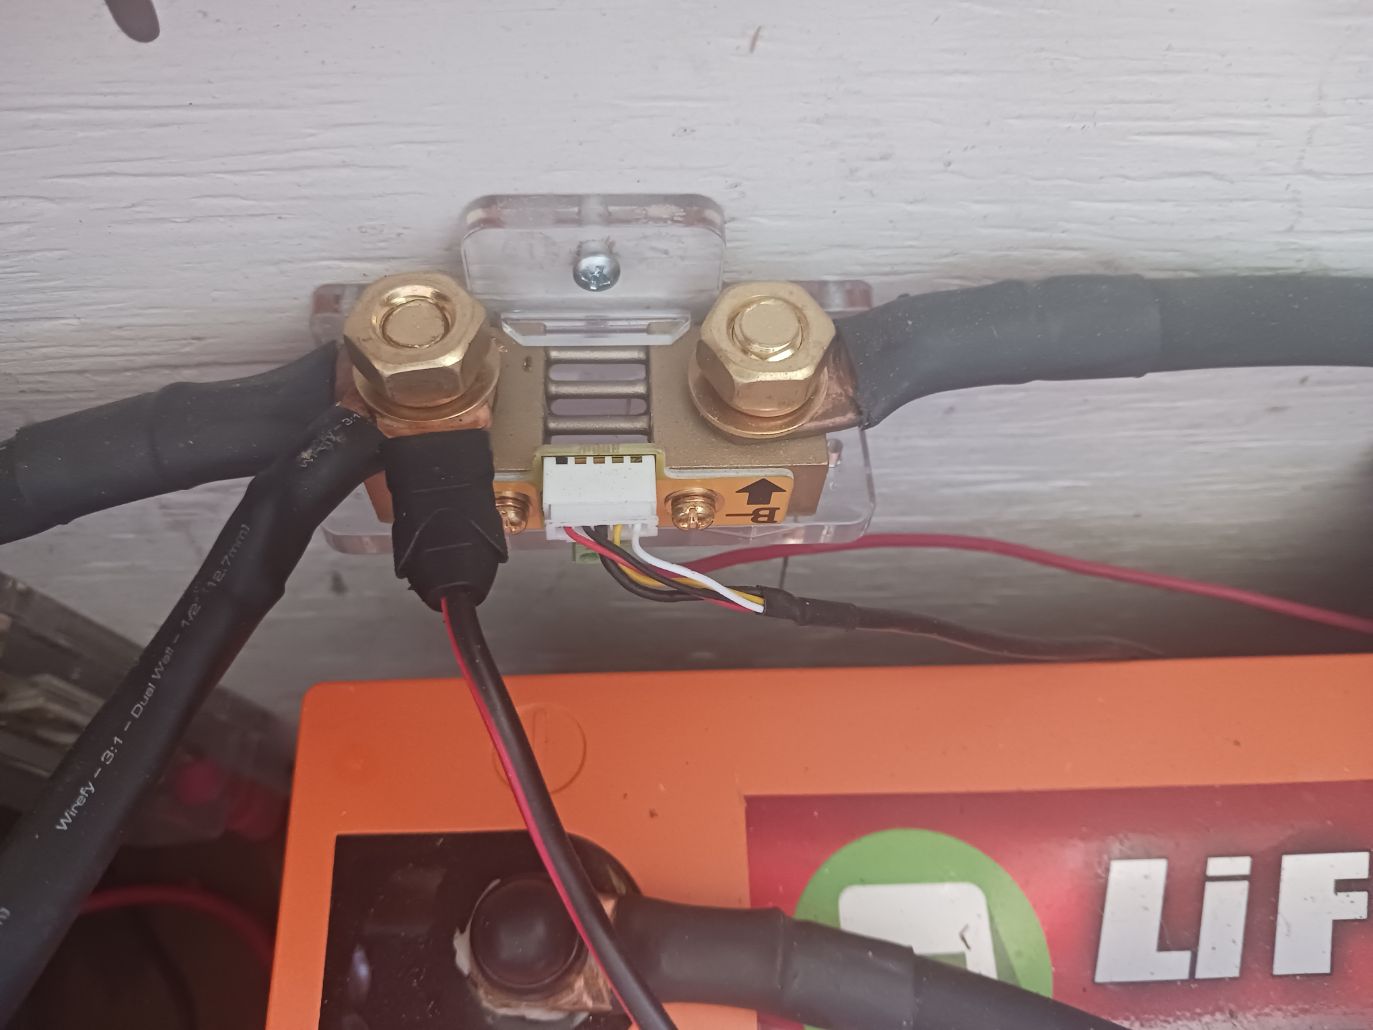
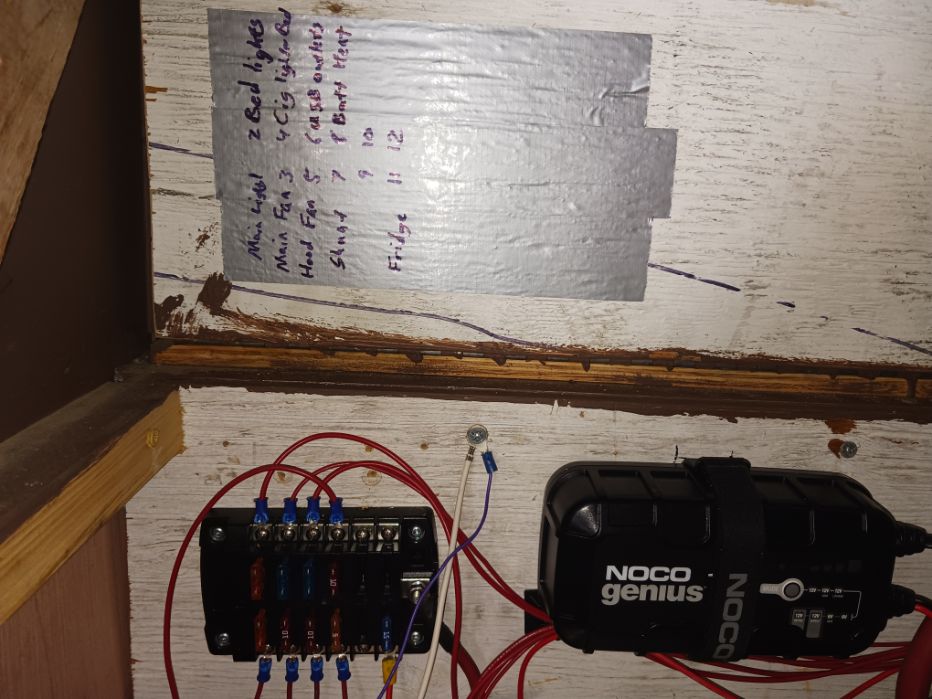
I installed the controller in the battery box. I had built a couple of vents into the box for the old AMG battery off gassing but with the new LiFePO4 I don’t have to worry about that so I mounted the heatsink for the controller right on top of one of the vents to help with cooling. I may put a computer fan on the back side eventually but we’ll see if I need to first. Being this close to the battery is nice. I’m now running 24v into the controller and 12v out so it is 10awg from the panels all the way to the controller but I did bump up to 8awg from the controller to the battery even though it’s only a foot or two away. I put a 40amp in line fuse between the battery and hooked the positive lead directly to the positive terminal with the negative lead hooking up to the shunt. I did this mostly because I didn’t want to get into the buss bar box but I also wanted a direct line to the battery to avoid loss.
Battery Monitor:
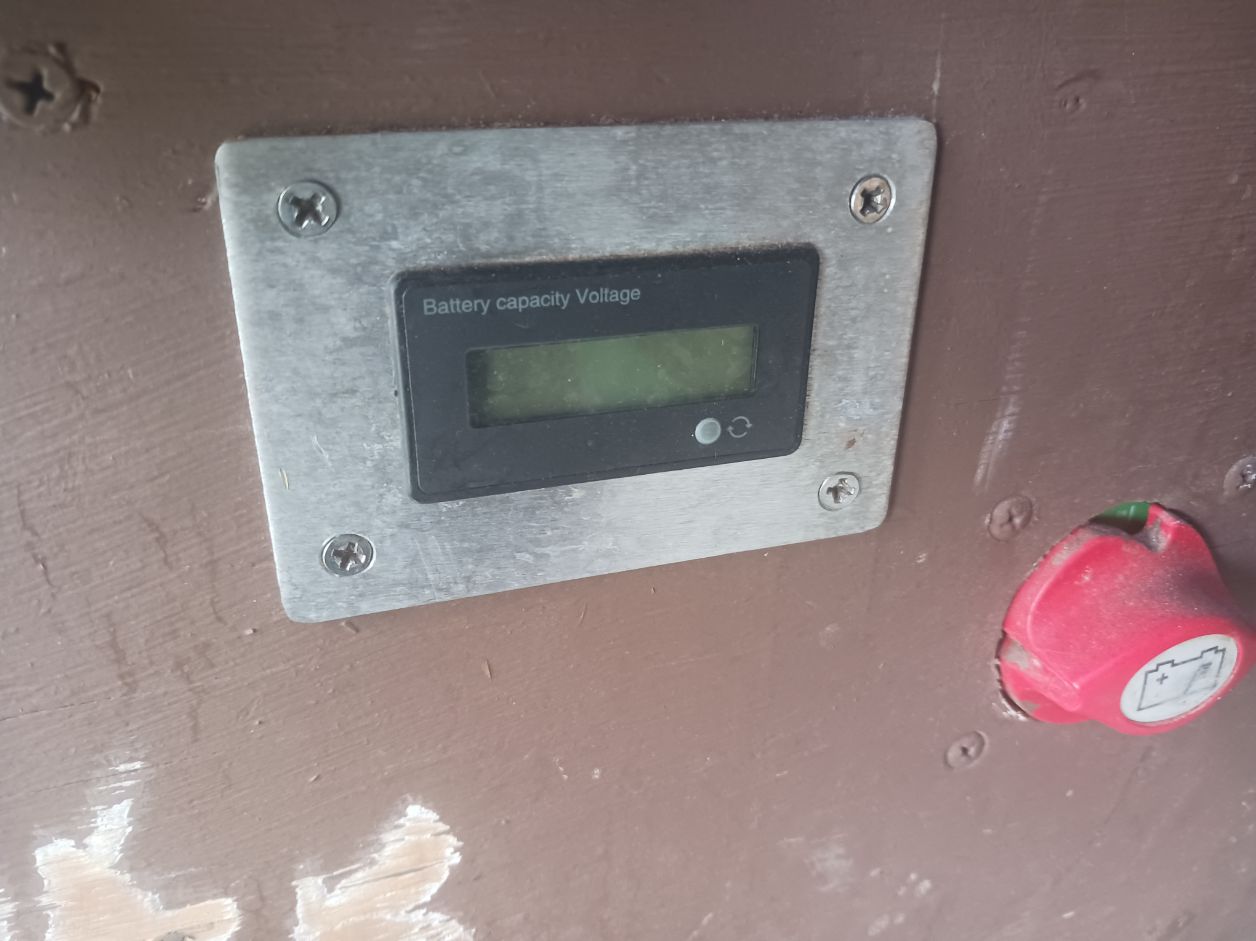
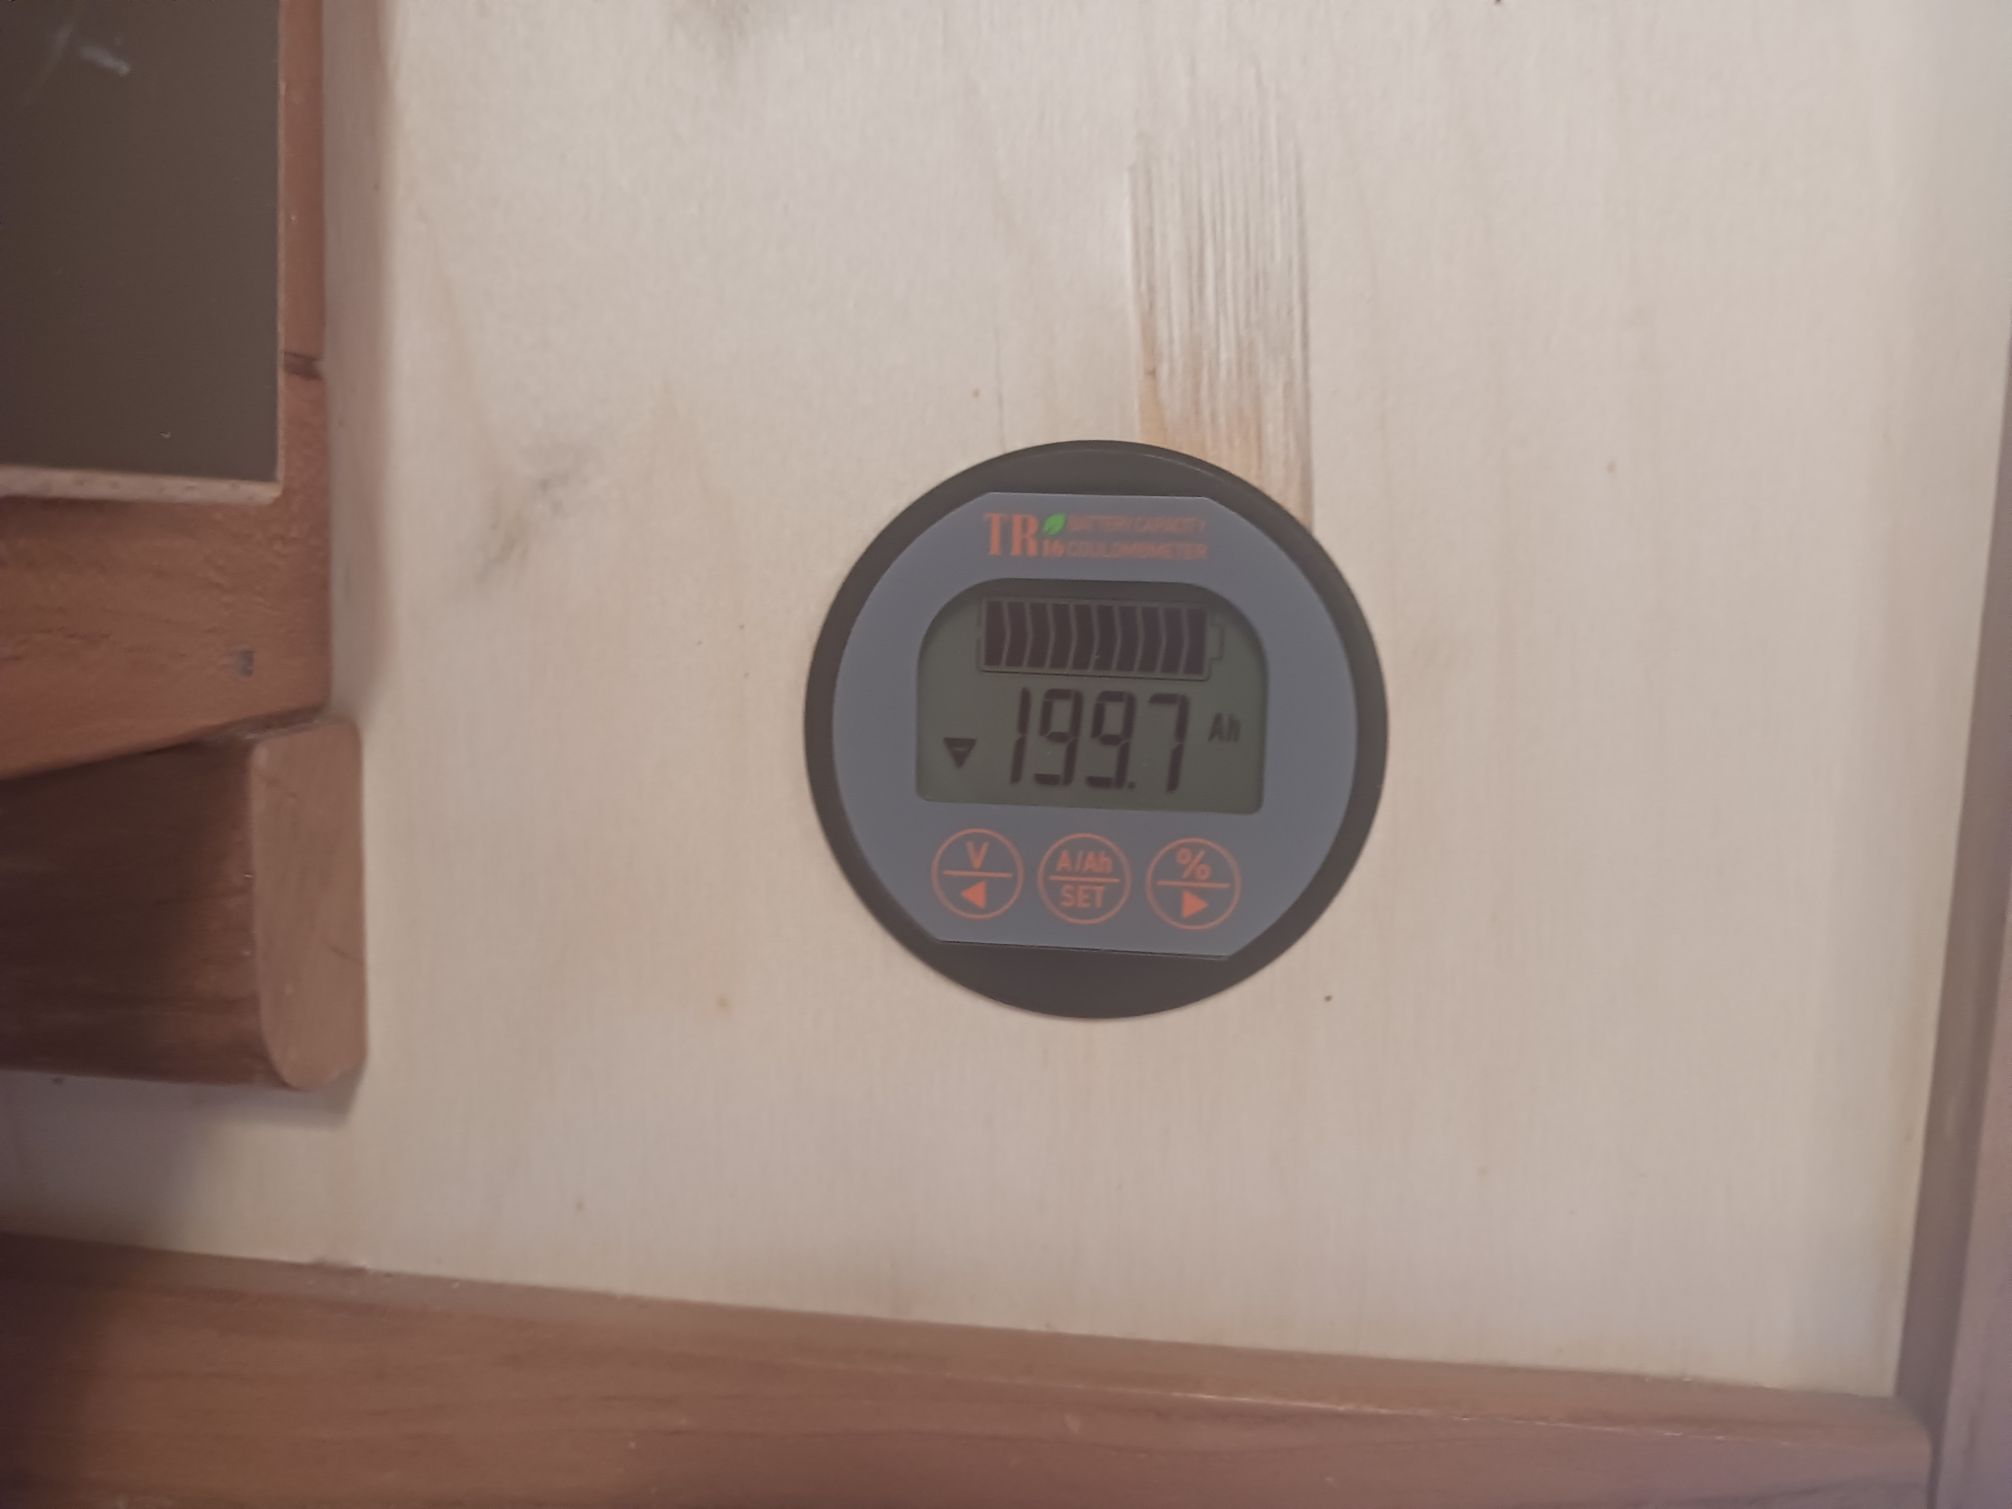
In the beginning I had a budget voltage reader that only told me what the overall voltage of the system was and the percentage. At some point something hit it and it was stuck in percentage mode so I couldn’t even see the voltage just what percentage the system was at. During the day, or anytime the batteries were charging it would just read 100% but if I flipped the kill switch at the battery to isolate it, it would tell me the percentage of the battery. I have now replaced this with a Camway monitor with 500amp shunt and it has really helped me diagnose issues and keep track of my battery as it charges which was really helpful when I was charging off the generator while the controller was down. 500amp is way overkill given my new battery but when I bought it, I was still running the AMGs and matched the ANL fuse talked about in the next section. I bought it over a year ago to help me diagnose some issues and hadn’t installed it until now.
This is a really simple monitor with only 4 setting and no tracking over time but it has all the info I have needed to trouble shoot, so far. I’m not really the type of person that cares how many watts my system generated at 2pm last Tuesday so the tracking over time didn’t really matter to me as much. Having a shunt style battery monitor has been a game changer, I’m glad I finally installed one.
Breakers and fuses:
One of the more economical choices I made in the beginning was to get budget breakers and a budget fuse block. These were used for the power distribution and it led to some weird issues that took some time to trouble shoot. The most notable of the issues, I put a 300amp breaker on the line going to the inverter and it would trip whenever the battery was around 70% and I was running my 900w coffee maker (the biggest power draw I ever have). As I brew my coffee in the morning, often before the sun comes up in winter, this became a real hassle. The conclusion we came to was that the smaller terminals and cheaper inner components of the budget breaker were heating up as the voltage dropped and the amps had to come up to be able to make the 900w of AC. The breaker should have been able to handle 3600w, and never should have tripped with only 900w running through it. I have replaced it with a 150amp breaker from Blue Sea Systems and even though is supposedly half the amperage the much bigger lugs and higher quality componentry should fix my issue. I’ll report back in a few months. The screw in the wire could have also contributed to this issue but it is still weird that it only happened when the batteries were below 70%. Both were likely the problem.
I also had issues with my fridge not running that I attributed to the lower battery capacity but after getting the new battery and hooking a battery monitor to the system I discovered that the fridge was cutting out as it turned on the compressor and drawing more juice. The monitor would be reading 13+ volts but the fridge would kick on and start to run just to shut off cycling a few times before it would finally kick in and run. I had run 16awg wire through the walls to the fridge and it was on its own fuse but it still acts like it is suffering from line loss. After pulling up the floor and seeing the abraded wire I realized that that was more likely the culprit but I had already bought some stuff so. I decided to replace the budget 100amp breaker and budget fuse block with Blue Sea Systems versions and I also replaced the wiring with 12/2, tinned OFC copper, marine wire and ran a dedicated positive and negative directly from the fuse block and negative on the shunt to the fridge to cut out the line loss. This was a different issue than I was having with the old batteries, though it was happening then as well. I don’t regret buying the upgraded breaker and block even though it wasn’t my issue, I’m happy to have higher quality parts in place and I should have run a dedicated positive and negative from the beginning, 12awg is overkill but the fridge is the most important device in my camper.
Coming off the battery, on the positive side, I placed an ANL, 500amp fuse then a 1250amp kill switch before heading to the buss bar. The new LiFePO4 only has a 200amp BMS so I replaced the 500amp with a 175amp to protect the BMS. I never really needed the 500amp fuse, in the beginning I was going to put a bidirectional separator on to be able to charge the house batteries from the truck’s alternator, and in a pinch, I would have been able to push a button to start that truck if the coach batteries were dead. I changed my mind and never installed the separator and I was informed that this would likely harm the batteries if I used it to start the truck anyways.

Bumping Solar up to 24V:
When I initially installed the system, I ran 10awg S/O wire from the panels to a MC4 four-way splitter on both the positive and negative and then ran 8awg wire from there to the charge controller, wired parallel so 12v. I thought the 8awg was also S/O but a few years in the sun proved that it was not so it had to be re-run. I had plenty of the 10awg left over to be able to rewire it and I was broke at the time so that is what I used. Given the that it was being run less than 8 feet, 10awg was sufficient according to the charts. With the new charge controller however, I decided to run series/parallel to bump the voltage from 12v to 24v which will cut the amps in half, making the wire in the wall more than sufficient.
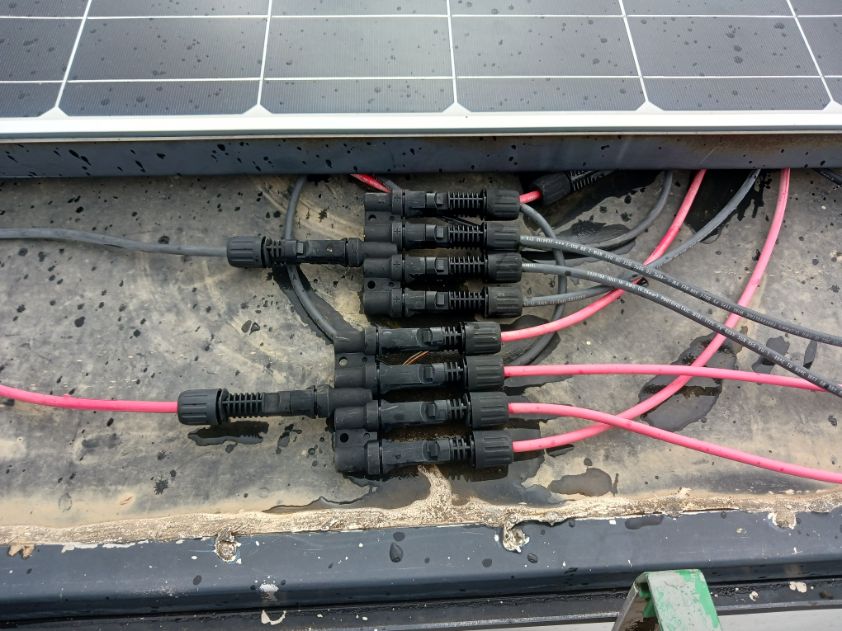
I have been having connection issues with the MC4 connectors on the roof where they would disconnect from time to time and not charge which was really fun diagnosing when we also had 3-4 days of snow and cloud cover and the charge controller may or may not have been going in and out. Every time I moved the camper, I had to check to make sure I still had power at the controller and if I didn’t, I had to climb up on the roof and check all of the connections. I’m sure this issue is because I used budget MC4 connectors since they are the standard in the solar market but I have replaced all of them with more solid crimp connectors and heat shrink while I rewired it series/parallel. 12 days after I installed the new charge controller, I still wasn’t getting a full charge off the panels during the day and I finally had the time to do this switch. The next day I was fully charged by noon. I was starting to worry that I had a panel or two out, but nope, just bad MC4 connectors.
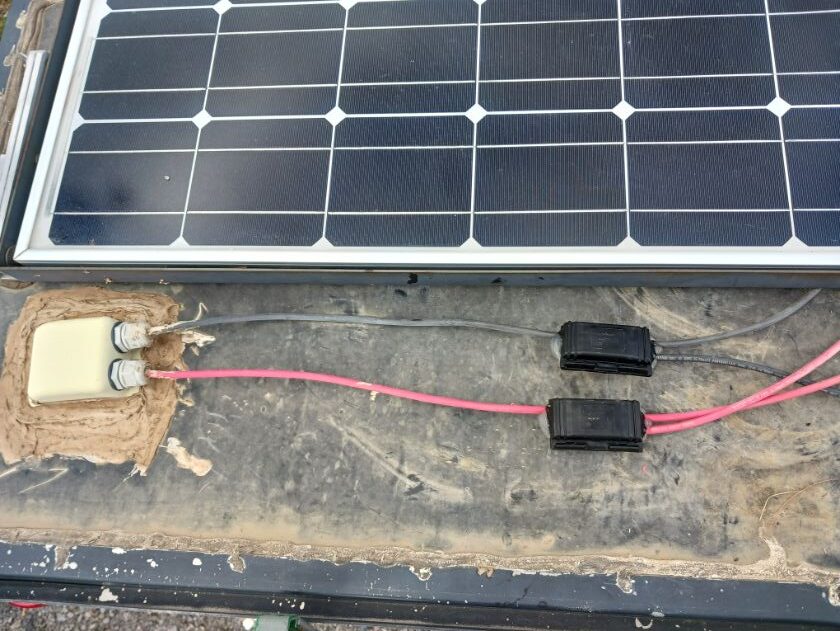
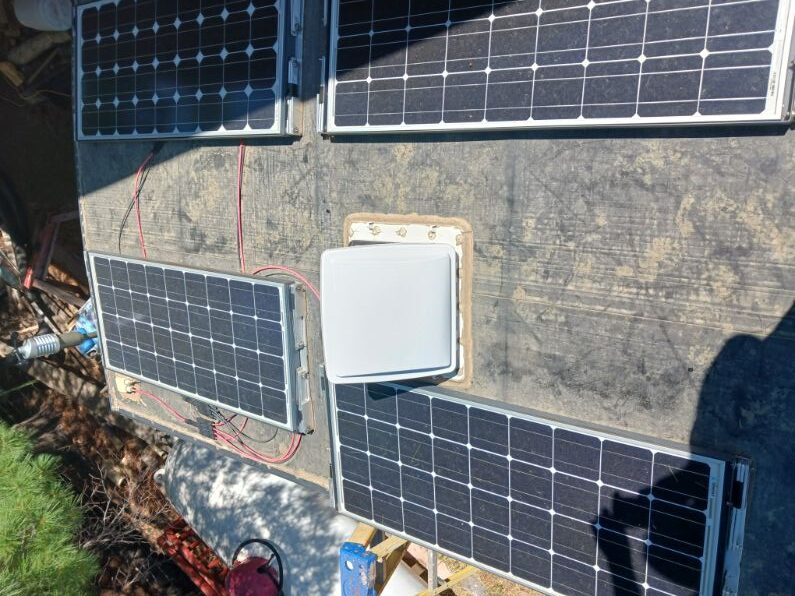
While I was up top messing with the panels, I finally bought some pins to lock the panels down when I drive. I had built a tiltable system that saved my butt last winter but I never got anything to lock them down. I had wrapped duct tape around the arms which prevented them from lifting but made them a real bitch to deploy. I also had nothing to stick in the kick stand to lock it in the up position so a strong wind would move them around. Theses new pins solve all the problems but they were not cheap, hence the reason I hadn’t bought them before. At some point though, one of my panels lost its tape and started to float while driving pulling the screws out of the roof and I almost lost the panel. I had to do some patch work and resealing but the panel is secure again and now I have pins that should keep this from happening again.
AC Charging:
The AIMS 1500w inverter/charger that I have, has an AC fast charger built into it and it works great, except… It is old enough that it doesn’t have a lithium setting for charging but having it set for sealed lead acid, 14.4v bulk charge, is working for the bulk charge but then it goes into a lower volt top off mode that never seams to turn off or get the battery to full. Not a big deal but I also wanted a float charger as I am about to take a job where I will be out of town and away from my camper for weeks to months at a time and after the last issue, I had with the solar not charging while the camper sat, I wanted a maintainer built in as well. At my last job we use the NOCO charger/maintainers and jump packs all over the place so I know they are a good quality. I decided on the Genius 10 and mounted it into the battery box, wired to the battery with a bulkhead plug going through the exterior wall so that I could plug it in when shore power is available. This now gives me a fast charge option, 25amps-35amps, for when I only have a few hours to get a charge and a slower, 10amp charge, and 1-2amp maintainer for when I park over night or longer with shore power.

")
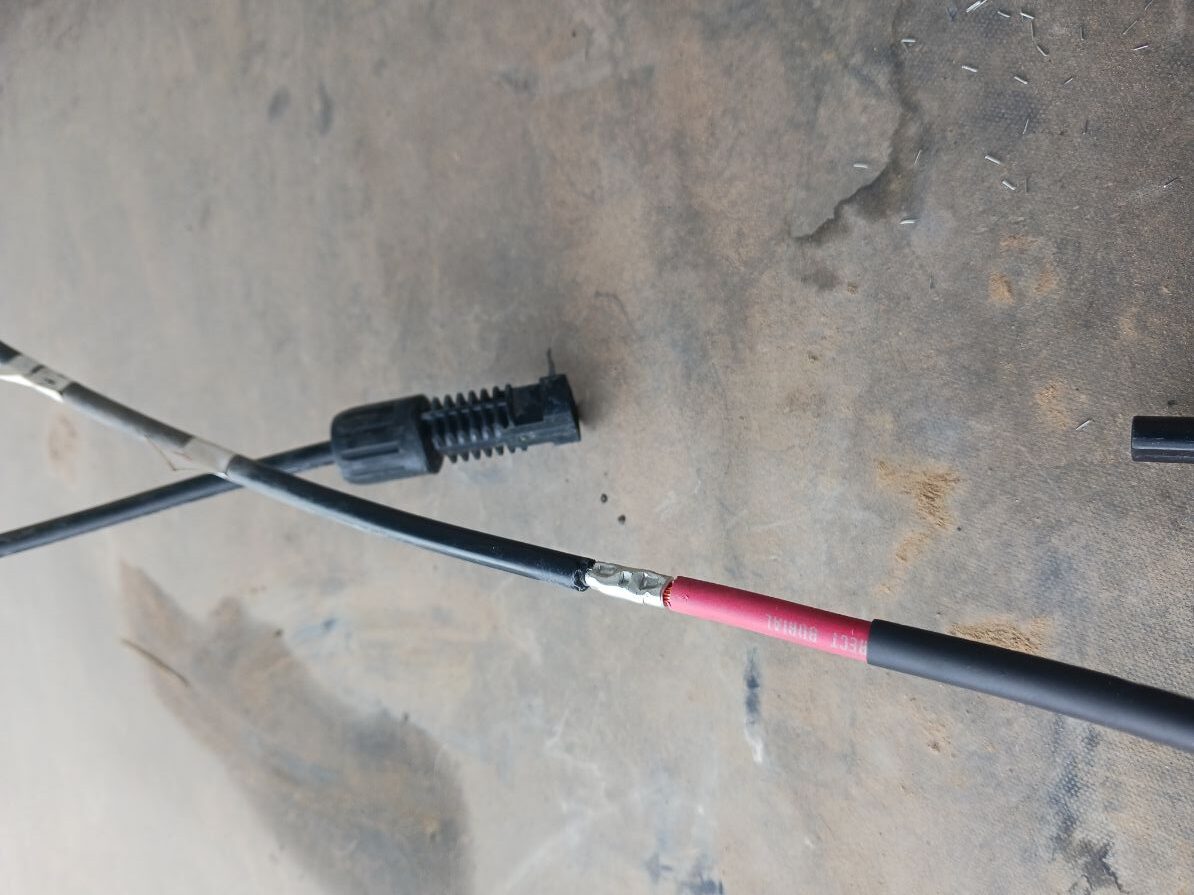
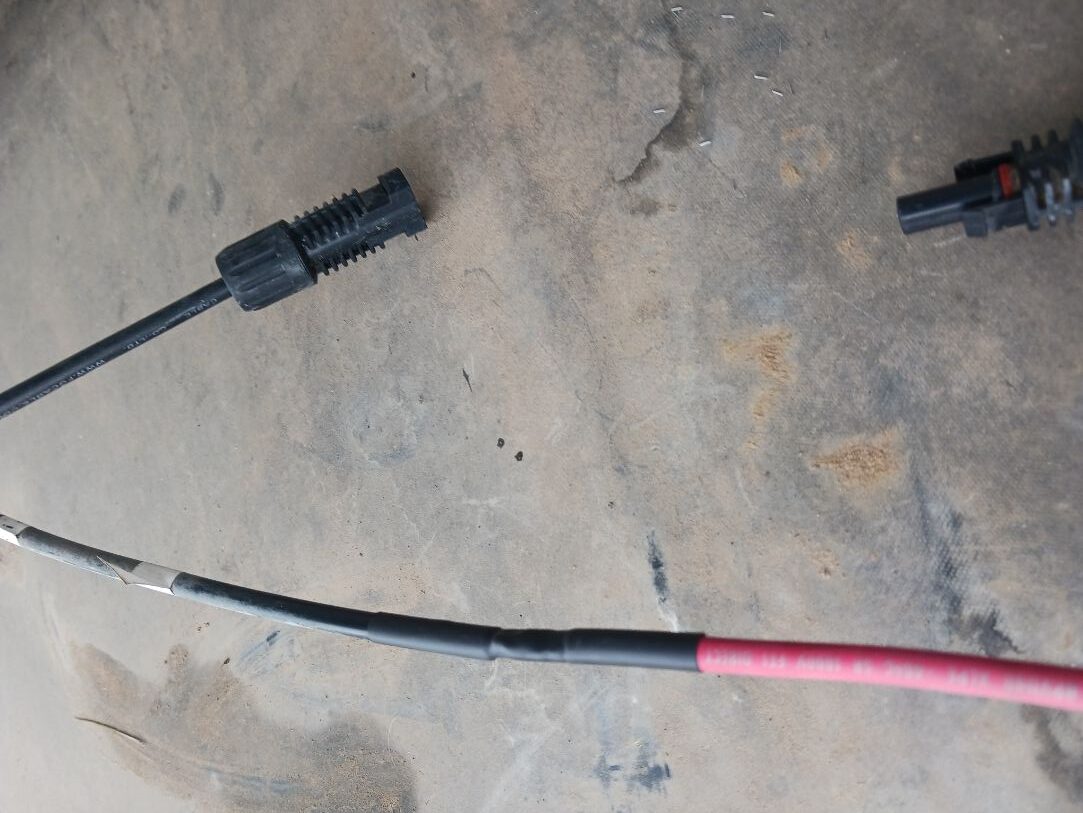
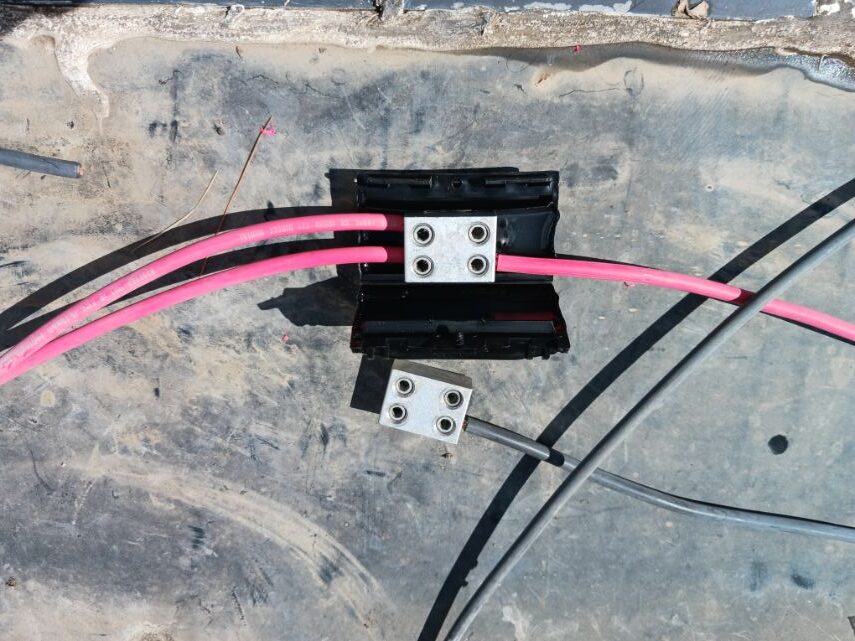
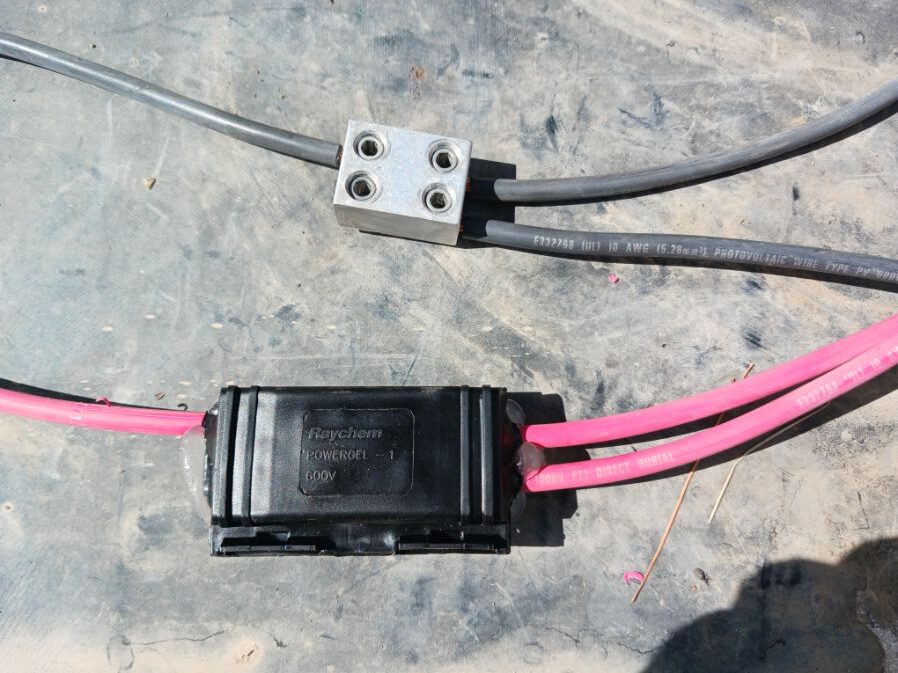
External quick disconnect:
When I wired the camper originally, I put a rather beefy quick disconnect on the outside with 0awg wires run to the positive and negative terminal blocks. The original reason for putting this in was for the charging that I was going to come off of the alternator on the truck. I had bought a bidirectional separator, a 100amp breaker and a few other things but never bought the wire for it. After being off grid for a few years I’ve decided I don’t really need this form of charging and I usually don’t drive enough, with the camper on, in a day to put a huge dent in the power generated anyway. I’ve decided instead to use this outlet/inlet for a few other purposes. I want to set up some portable panels, like 200w worth, that I can use in the winter to help generate more power on the shorter days but also so I can occasionally park the camper in the shade and still generate. I would also like to be able to have an external 12v outlet for running accessories that may or may not ever come about but I like to have options.
These are future plans but for now I needed to be able to protect and isolate the disconnect. When I wired it all in originally, I didn’t put a fuse or shut off on it. I can’t remember why I didn’t think it was important back then but as I’ve been rewiring and replacing, I’ve decided to put these in now. Rewiring the battery going from two to one left me a nice length of 0awg with lugs already soldered on so it was a pretty simple install. For now, the line is switched off but it is ready, and protected, when I decide to use it.
That was a lot of time and money that went into this upgrade, I wish I had spent the money the first time but I did get 5 years out of the old components and everything I took out went to my buddy for his solar water heater project including the breakers and fuse block so it wasn’t waisted. His system isn’t as important for living so he can get away with lower quality parts. It’s scary that I had a screw right though hot lead and that became my ground. I’m lucky I didn’t have a bigger problem or fire, stupid mistake for sure. With the ground bonded properly now, problems like abraded wires should blow fuses which should help me diagnose a lot faster but I’m also more protected, lesson learned. I’ve learned a lot since the initial install and realize I made a few other small mistakes like running the negative to the frame instead of running a wire back to the buss. The fridge is now run this way as well as all of the big energy draws but the smaller draws like lights, fans and usb outlets are still negative to the frame. It would mean taking the entire camper apart, all the way down to the frame to fix this now so I’m not going to do it, but if I have something go bad, or decide to add a circuit, I’ll replace the circuits I can this way. Hopefully I get more than 5 years out of this new setup, I believe I will but time will tell. I’m sure some minor changes will be made here and there.
0 Comments